Table Of Content
Next, we’ll build the external peek-downs and shooting floor. Garage doors go above where the ladder hatches will eventually be. If a base is small, the maintenance cost is usually manageable, allowing the occupants to spend more time freely rather than farming for upkeep resources. If a base is large, it can become very taxing, requiring much more emphasis on constantly gathering resources strictly for upkeep costs. It’s also wise to keep an untouched stash of resources in the event a base is raided. Being able to put up walls or repair walls being broken can stop raiders in their tracks and prevent deeper damage.

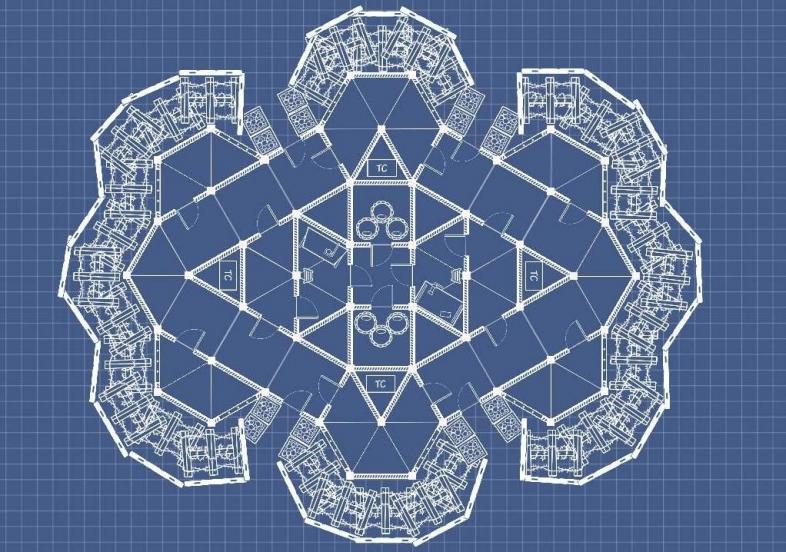
The Cerberus solo base design features:
GSI's New GSI-40 Series Grain Bin Features 10% Larger Capacity - Farm Progress
GSI's New GSI-40 Series Grain Bin Features 10% Larger Capacity.
Posted: Wed, 25 Jan 2023 00:32:59 GMT [source]
The strongest place to put the main turret battery circuit is in this high-quality metal corner in the core with a garage door. Start by upgrading the outer foundations to sheet metal. Then, build a high visibility airlock on all three sides. And, of course, the base can be realistically progressed in stages and starts being defendable before it’s even finished. When compared to those other designs, this base has a very respectable upkeep considering it is only one TC for the main base. The base retains internal and external peek-downs despite it being a single TC.

Base Resource Cost
It is secretly a floor stacked design, making it much harder for raiders to use the popular top-down raiding method. This base is insane, it's a very good designed start-to-main base that can be used throughout the whole playthrough. You will need a lot of people like really, a lot of people to build this base and to maintain it. To reach all the loot you will need over 150 rockets which is just insane. It takes 178 HQM, metal fragments, stone, wood, and 50 gears.
RUST Solo Starter Base Guide (
I really like the three furnaces on the second floor like this. After they are in, build a frame, and add the window. One more thing we’ll be upgrading both of these walls and rotating the one on the loot room so that it cannot be soft-sided from the level above. To add in the other two loot rooms, we first need to secure the drop-down a bit more and upgrade the door it has. This will separate both of the loot rooms, and then we can add the half-height and the garage door to both. In this next part, we’ll enclose the basic second-floor layout.
Once again, if you want a way up to the top, you can add another hatch right into here. You can see the angles we are working with now, and it’s up to you which embrasures you want to use. I like to use the vertical window embrasures, and we will need nine of them. Some people like to have these facing the inside of the window, which is all preference, but I found over the years that my preference is the outside like this. The defense floor is pretty much done at this point.
Putting Together a RUST Base Design Strategy
How to build a simple yet effective 2x2 starter base in Rust - Sportskeeda
How to build a simple yet effective 2x2 starter base in Rust.
Posted: Tue, 12 Jan 2021 08:00:00 GMT [source]
It's designed very good, and if you ever see this base on a server, the people that run the base probably run the server too. It takes 350 HQM, metal fragments, stone, wood, and 57 gears. The upkeep will be very high, but in the end, everything is worth it. This is a trio base that can be very demanding to raid. It takes a lot of materials but in the end, it will be worth it. Of course, the base can be used by more than 3 people, as it's made to be really compact.
When enemy raiders are attacking a base, they often use rockets to destroy outer walls, where there’s plentiful room and line of sight. These attacks are typically from an outside position, pointed in an inward direction, meaning they will blow up the outermost walls first. The tool cupboard often referred to in-game as “TC”, provides a radius of building privilege to players who are authorized with it. This is the most important piece of a base to protect, hands down. If it is placed poorly, the base will likely become griefed.
It also utilizes multiple tool cupboards to prevent the enemy from being able to build over the walls and inside the base. Today I'm going to show you new, not outdated, base designs that will help you start your playthrough. While the base is certainly nothing crazy, it’s pretty much a jack of all trades and should hopefully be perfect for the minimalist solo players out there. I didn’t include it in the video, but I highly recommend you include auto-turrets in the compound to protect against grubs or raiders.
Let the law of probability be a guiding hand for making RUST base design decisions. And remember to consider specialization for a particular purpose for each build. All base designs have pros and cons, each stronger in some areas, and weaker in others, but every base will be a target.
This base provides players with a starter 2x1 which can be expanded phase by phase into The Tyrant. This makes the base the only structure you will need throughout the wipe. Aside from the modularity it provides, you are also greeted by 4 external TCs. First of all, instead of using a double-stacked foundation, which in my opinion is pointless to build, you can go for something much simpler instead.
Now for solo duo trio, once again, I like to use this one. Now there is also an alternative here, which I do use for the other two. Adding ramps to each part like this gives a cool concept. The idea behind using this in this design is if raiders go through the back walls, they will end up not being able to ladder in easily.
Replace the wooden doors on the shell and occupy the windows with glass and or embrasures. With the inner peeks completely enclosed, you can utilize the space with deployables or boxes. Outside of the shell, you have to build this floating floor for the external peek-downs since you won’t be able to build it after this stage.
This can let you fit an extra loot room in the corner of the starter base. Rust Daddy is behind a number of incredible builds, from the Norseman – a Viking-inspired temporary base for duos – to the Colossus, a 24-man Zerg base. It was this enjoyment that led him to start developing his own experimental test bases on a private server and share his findings online. Next, we’ll add the door frames as we would use in a normal roof design. You could get fancier here, but I’m just going to use three windows on each side like this. In the center here, I’m going to add two frames and then the entire roof.
We relocated our three sleeping bags, added a level two furnaces, and have some space for boxes underneath the triangle. This frees up space so that we can transform our main loot room into this configuration. If you’re unsure how to do this, I will link a video in the top right to make this very easy for you. This RUST base design is a long-awaited remake of its predecessor, Rust Base Dream. This base design contains more space, storage, both offline and online defenses, and is stronger overall.
It is a stability bunker with 360-degree auto turret coverage. Made of pure sheet metal and carefully layered, it will make the raiders want to think twice before they use their explosives here. A 2x3 is not a big base in Rust, but this gets the job done. Surrounded by high walls and with the compound filled with auto turrets, it will pose a challenge to any raiding party.
The way we’re going to use these without neglecting the raid cost is by adding a window frame and glass window. Now it’s much easier to add whatever you’re going to add first and then place the window frame in the window. There are a bunch of different combinations you can use.


No comments:
Post a Comment